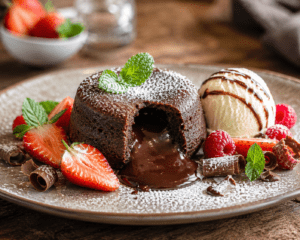
Chocolate Lava Cake is one of the most popular chocolate desserts in the world. Its soft outer cake and warm, gooey molten chocolate center make it an irresistible treat for chocolate lovers. Whether you’re preparing a romantic dinner, celebrating a birthday, or simply craving something sweet, this restaurant-style dessert is surprisingly easy to make at home.
In this complete guide, you’ll learn how to make the perfect Chocolate Lava Cake with simple pantry ingredients. We’ll also share expert baking tips, common mistakes to avoid, serving ideas, and storage tips so you can achieve bakery-quality results every time.
What Is Chocolate Lava Cake?
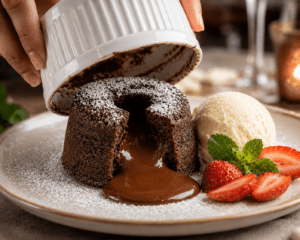
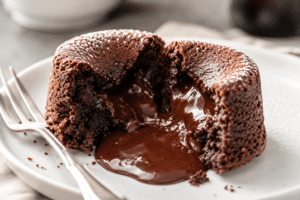
Chocolate Lava Cake, also known as Molten Chocolate Cake, is a rich chocolate dessert with a soft baked exterior and a warm, liquid chocolate center. When cut open, the chocolate filling flows out like molten lava, giving the dessert its famous name.
The dessert became popular in fine dining restaurants and is now enjoyed worldwide because it’s elegant, delicious, and surprisingly easy to prepare at home.
It’s perfect for:
- Birthday celebrations
- Valentine’s Day
- Dinner parties
- Family gatherings
- Holiday desserts
- Weekend treats
- Chocolate lovers of all ages
Why You’ll Love This Recipe
This homemade Chocolate Lava Cake recipe is loved for many reasons:
- Rich and intense chocolate flavor
- Soft cake with a gooey molten center
- Easy to prepare in under 30 minutes
- Uses simple pantry ingredients
- Perfect for beginners and experienced bakers
- Great for birthdays, parties, and special occasions
- Better than many restaurant versions
- Easy to customize with your favorite toppings
Whether you’re making dessert for guests or treating yourself, this recipe delivers a luxurious chocolate experience with minimal effort.
Kitchen Tools Needed
Before you start, gather these tools:
- Mixing bowls
- Whisk
- Rubber spatula
- Measuring cups and spoons
- 4–6 ramekins
- Baking tray
- Cooling rack
- Fine mesh sieve
- Oven mitts
Using the right tools helps ensure even baking and makes the process smoother.
Chocolate Lava Cake Recipe
Delicious Variations to Try
One of the best things about this Chocolate Lava Cake Recipe is how easy it is to customize. Here are some delicious variations you can try at home.
Nutella Lava Cake
Replace the chocolate filling with a spoonful of Nutella for an extra creamy and hazelnut-flavored center.
Peanut Butter Lava Cake
Add one tablespoon of smooth peanut butter to the center before baking for a rich chocolate and peanut butter combination.
White Chocolate Lava Cake
Use melted white chocolate instead of dark chocolate for a sweeter and creamier dessert.
Oreo Lava Cake
Mix crushed Oreo cookies into the batter or place a whole Oreo in the center before baking.
Salted Caramel Lava Cake
Fill the center with thick salted caramel sauce for a delicious sweet and salty flavor.
Best Serving Suggestions
Chocolate Lava Cake tastes even better when paired with delicious toppings.
Try serving it with:
- Vanilla ice cream
- Fresh strawberries
- Fresh raspberries
- Chocolate curls
- Chocolate sauce
- Caramel drizzle
- Powdered sugar
- Whipped cream
- Mint leaves
- Chopped almonds
- Chopped hazelnuts
These toppings enhance both the flavor and presentation, making your dessert look restaurant-quality.
Ingredients You’ll Need
Making the perfect Chocolate Lava Cake Recipe starts with high-quality ingredients. Using real butter and good-quality dark chocolate will give you the rich flavor and gooey molten center that makes this dessert so popular.
Ingredients
- 120g (4 oz) dark chocolate (60–70% cocoa), chopped
- ½ cup (113g) unsalted butter
- 2 large eggs
- 2 egg yolks
- ¼ cup (50g) granulated sugar
- 1 teaspoon vanilla extract
- ¼ teaspoon salt
- ¼ cup (30g) all-purpose flour
- Butter (for greasing ramekins)
- Cocoa powder (for dusting ramekins)
Step-by-Step Instructions
Step 1 – Prepare the Ramekins
Preheat your oven to 425°F (220°C).
Generously grease each ramekin with butter, then dust the inside with cocoa powder. Tap out the excess cocoa powder. This helps the cakes release easily after baking.

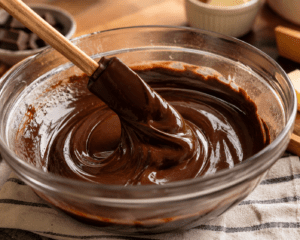
Step 2 – Melt the Chocolate
Place the chopped dark chocolate and butter in a heatproof bowl.
Melt them together using a double boiler or microwave in 20-second intervals, stirring after each interval until smooth and glossy.
Allow the mixture to cool for 3–5 minutes.
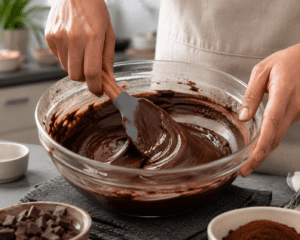
Step 3 – Make the Batter
In another bowl, whisk together:
- Eggs
- Egg yolks
- Granulated sugar
- Vanilla extract
Whisk until the mixture becomes light, pale, and slightly thick.
Slowly pour the melted chocolate mixture into the egg mixture while whisking continuously.
Finally, fold in the flour and salt using a rubber spatula. Mix just until combined—do not overmix.
Step 4 – Fill the Ramekins
Divide the batter evenly among the prepared ramekins, filling each about ¾ full.
Gently tap each ramekin on the counter to remove any air bubbles.
Step 5 – Bake
Place the ramekins on a baking tray and bake for 11–13 minutes.
The edges should look firm, while the center should remain slightly soft. This is the secret to achieving the perfect molten chocolate center.
Avoid overbaking, or the lava center will become fully cooked.
Step 6 – Serve
Let the cakes rest for 1 minute after removing them from the oven.
Run a small knife around the edge if needed, place a dessert plate on top, and carefully invert the ramekin.
Dust with powdered sugar and serve immediately while the chocolate center is still warm and flowing.
Delicious Variations to Try
One of the best things about this Chocolate Lava Cake Recipe is how easy it is to customize. Here are some delicious variations you can try at home.
Nutella Lava Cake
Replace the chocolate filling with a spoonful of Nutella before baking. This creates an extra creamy, hazelnut-flavored molten center.
Salted Caramel Lava Cake
Add a teaspoon of thick salted caramel sauce to the center of each ramekin before baking for a sweet and salty surprise.
White Chocolate Lava Cake
Swap dark chocolate for high-quality white chocolate to create a creamy, sweet version of this classic dessert.
Oreo Lava Cake
Place a whole Oreo cookie in the center of the batter before baking for a crunchy chocolate twist.
Peanut Butter Lava Cake
Add a spoonful of creamy peanut butter to the center for a rich chocolate and peanut butter combination.
Best Serving Suggestions
Chocolate Lava Cake is delicious on its own, but the right toppings can make it even more special.
Try serving it with:
- Vanilla ice cream
- Fresh strawberries
- Fresh raspberries
- Chocolate curls
- Chocolate sauce
- Caramel drizzle
- Powdered sugar
- Whipped cream
- Mint leaves
- Chopped almonds or hazelnuts
These toppings add flavor, texture, and make your dessert look restaurant-quality.
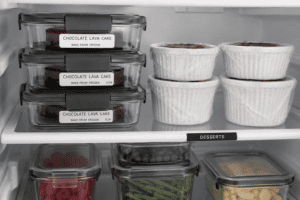
Storage Tips
If you have leftovers, store them properly to maintain their texture and flavor.
Refrigerator
- Place the cakes in an airtight container.
- Store for up to 3 days.
Freezer
- Wrap each unbaked filled ramekin tightly with plastic wrap.
- Freeze for up to 2 months.
- Bake directly from frozen by adding 2–3 extra minutes to the baking time.
Common Mistakes to Avoid
Avoid these mistakes to achieve the perfect molten center every time:
- Overbaking the cakes
- Using low-quality chocolate
- Not greasing the ramekins properly
- Overmixing the batter
- Serving the cakes too late after baking
- Filling the ramekins too full
- Skipping the cocoa powder dusting
Nutrition Facts (Approximate Per Serving)
Nutrient Amount Calories 420 kcal Carbohydrates 36 g Protein 6 g Fat 28 g Saturated Fat 16 g Sugar 24 g Fiber 3 g Sodium 120 mg
Frequently Asked Questions (FAQs)
1. Can I make Chocolate Lava Cake without ramekins?
Yes. You can use muffin tins, but reduce the baking time slightly and grease them well.
2. Why didn’t my lava cake have a molten center?
It was likely baked too long. Remove the cakes when the edges are set but the center is still soft.
3. Can I prepare the batter in advance?
Yes. Fill the ramekins, cover them, and refrigerate for up to 24 hours before baking.
4. Which chocolate is best?
Use good-quality dark chocolate with 60–70% cocoa for the best flavor and texture.
5. Can I reheat Chocolate Lava Cake?
Yes. Microwave for 10–15 seconds, but freshly baked lava cakes provide the best molten center.
📋 Quick Recipe Summary
Detail Information Recipe Name Chocolate Lava Cake Preparation Time 15 Minutes Cooking Time 12 Minutes Total Time 27 Minutes Servings 4 Difficulty Easy Course Dessert Cuisine French-American Calories Approximately 420 kcal per serving
⭐ Final Thoughts
Chocolate Lava Cake is the ultimate dessert for anyone who loves rich, indulgent chocolate treats. With its soft cake exterior and warm molten chocolate center, this restaurant-style dessert is surprisingly easy to make at home. By following the step-by-step instructions and expert tips in this guide, you can create a perfectly baked lava cake that looks impressive and tastes incredible.
Whether you’re making it for Valentine’s Day, birthdays, dinner parties, anniversaries, or simply satisfying your chocolate cravings, this recipe is guaranteed to become one of your favorites.
Serve it fresh with a scoop of vanilla ice cream, fresh berries, or whipped cream for a truly unforgettable dessert.
If you found this recipe helpful, save it for later and share it with your family and friends so they can enjoy this delicious homemade Chocolate Lava Cake too.
Happy Baking! 🍫❤️